45Springboot
z自动配置
Spring Boot 的自动装配是一个核心功能,它允许开发者快速集成和使用各种启动器(starter)和库,而无需进行繁琐的配置。自动装配的原理基于 Spring Framework 的条件注解和 Spring Boot 的启动器。
自动装配的工作流程
自动装配的过程从 Spring Boot 的主程序类开始,这个类通常使用 @SpringBootApplication 注解。这个注解是一个组合注解,它包括 @SpringBootConfiguration、@EnableAutoConfiguration 和 @ComponentScan。这些注解共同工作,实现了自动装配的基础功能。
- @SpringBootConfiguration:标识这是一个 Spring Boot 的配置类。
- @ComponentScan:扫描并加载使用注解定义的 bean。
- @EnableAutoConfiguration:告诉 Spring Boot 开始根据类路径下的 jar 包依赖以及各种配置类来自动配置项目。
@EnableAutoConfiguration 是自动装配的关键,它通过 @Import(AutoConfigurationImportSelector.class) 导入了 AutoConfigurationImportSelector 类。这个类负责读取 META-INF/spring.factories 文件中的配置,并根据条件注解(如 @ConditionalOnClass、@ConditionalOnBean 等)决定哪些配置类应该被加载到 Spring 容器中。
条件注解的作用
条件注解是自动装配过程中的重要组成部分,它们决定了在什么条件下某个配置类或 bean 应该被创建和加载。例如,@ConditionalOnClass 注解确保只有当类路径下存在特定的类时,相关的自动配置类才会被激活。
自动装配的优势
自动装配的优势在于它极大地简化了项目的配置和依赖管理。开发者只需要添加相应的 starter 依赖,如 spring-boot-starter-web,就可以快速开始开发 Web 应用,无需手动配置 DispatcherServlet 或 Tomcat。
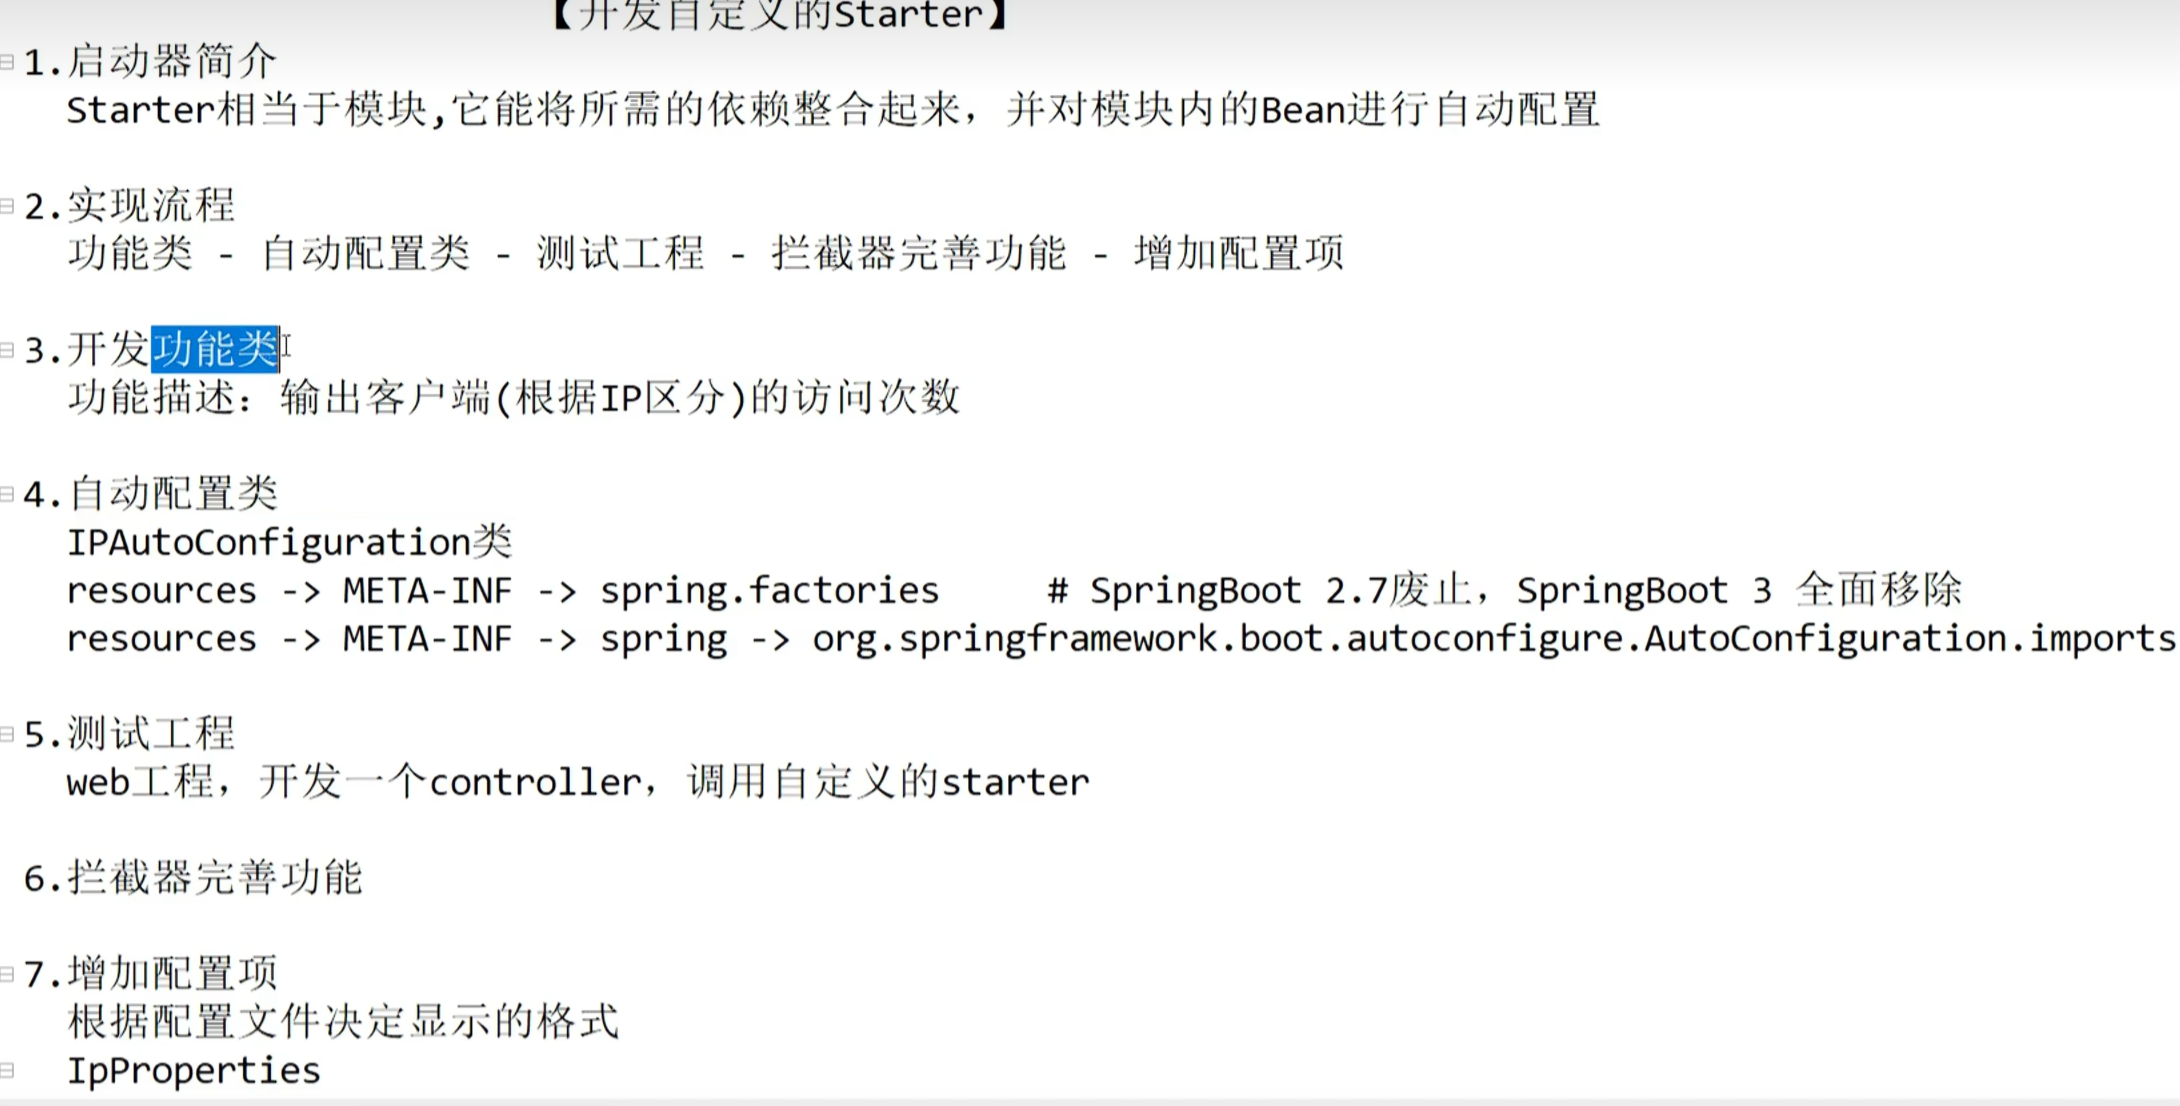
自定义 Starter 的开发
开发者还可以创建自己的 starter,以便在多个项目中重用配置和功能。自定义 starter 通常包括一个自动配置类,它使用 @Configuration 和条件注解来定义需要自动配置的 bean。此外,还需要在 META-INF/spring.factories 文件中声明这个自动配置类,以便 Spring Boot 能够在启动时加载它。
基础
怎么理解SpringBoot中的约定大于配置
它通过预设标准化的默认行为与项目规范,大幅减少开发者的手动配置,从而提升开发效率
(1)自动配化配置SpringBoot的自动化配置会基于项目依赖和运行环境,自动完成组件的初始化与集成.例如:引入spirng-boot-starter-web后,框架会自动检测Web开发依赖,进而配置内嵌Tomcat、Spring MVC的DispatcherServlet等组件
(2)默认配置SpringBoot为数据库连接、Web服务、日志、安全等场景提供最佳实践级的默认配置
Web应用默认内嵌Tomcat(8080);数据库连接默认采用性能优异的HikariCP连接池;日志默认通过logback输出Spring Data JPA默认开启事务管理,Spring Security提供基础HTTP安全防护
(3)项目结构约定SpringBoot提倡分层化的项目结构约定,Controller,Service,Mapper等
说几个启动器(starter)
spring-boot-starter-web: 这是最常见的起步依赖之一.它包含了Spring MVC和Tomcat嵌入式服务器,用于快速构建Web应用程序
spring-boot-starter_security: 提供了Spring Security的基本配置,帮助开发者快速实现应用的安全性,包括认证和授权功能
mybatis-spring-boot-starter: 这个Starter是由MyBatis团队提供的,用于简化在SpringBoot应用中集成MyBatis的过程,它自动配置了MyBatis的相关组件
spring-boot-starter-jdbc: 提供了基本的JDBC支持,可以通过在配置文件中配置MySQL的连接信息完成与数据库的交互
spring-boot-starter-data-redis: 用于集成Redis缓存和数据存储服务.
spring-boot-starter-test: 包含了单元测试和集成测试所需的库.
ljjgkq
现自己的SpringBoot Starter
命名规范===============================================
如果你快有孩子了,出生前你比较急的一定是起个名字。孩子的姓名标识着你和你爱人的血统,一定不会起隔壁老王的姓氏,肯定会招来异样的眼光。在maven中,groupId代表着姓氏,artifactId代表着名字。Spring Boot也是有一个命名的建议的。所以名字是不能够随随便便取得,可以按照官方的建议来取。
What’s in a name
All official starters follow a similar naming pattern; spring-boot-starter- , where is a particular type of application. This naming structure is intended to help when you need to find a starter. The Maven integration in many IDEs lets you search dependencies by name. For example, with the appropriate Eclipse or STS plugin installed, you can press ctrl-space in the POM editor and type “spring-boot-starter” for a complete list.
As explained in the “Creating Your Own Starter” section, third party starters should not start with spring-boot, as it is reserved for official Spring Boot artifacts. Rather, a third-party starter typically starts with the name of the project. For example, a third-party starter project called thirdpartyproject would typically be named thirdpartyproject-spring-boot-starter.
大概意思是
官方的 starter 的命名格式为 spring-boot-starter-{xxxx} 比如spring-boot-starter-activemq
第三方我们自己的命名格式为 {xxxx}-spring-boot-starter。比如mybatis-spring-boot-starter。
如果我们忽略这种约定,是不是会显得我们写的东西不够“专业“。
自定义一个Starter
下面我们就来实现一个自定义的发送短信的starter,命名为sms-spring-boot-starter。
- 引入
pom
1 | |
编写配置文件
发短信我们需要配置一些账号信息,不同的短信供应商,账户信息是不一样的,所以我们需要定义一个XXXXProperties 来自动装配这些账户信息。下面我们就以腾讯云和阿里云两家供应商为例;
1 | |
如果需要在其他项目中使用发送短信功能的话,我们只需要在配置文件(application.ym)中配置SmsProperties 的属性信息就可以了。 比如:
1 | |
还记的@ConfigurationProperties注解里面是不是有个prefix 属性,我们配置的这个属性是sms,配置这个的主要一个作用的话是主要用来区别各个组件的参数。这里有个小知识点需要注意下当我们在配置文件输入sms我们的idea会提示这个sms有哪些属性可以配置,以及每个属性的注释都有标记,建议的话注释还是写英文,这样会显得你比较专业。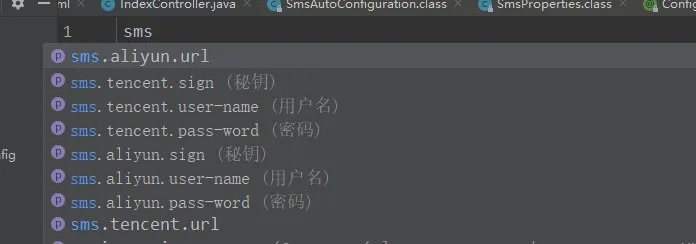
这个提示的话,是需要引入下面这个jar的。
1 | |
引入这个jar之后,我们编译之后就会在META-INF文件夹下面生成一个spring-configuration-metadata.json的文件。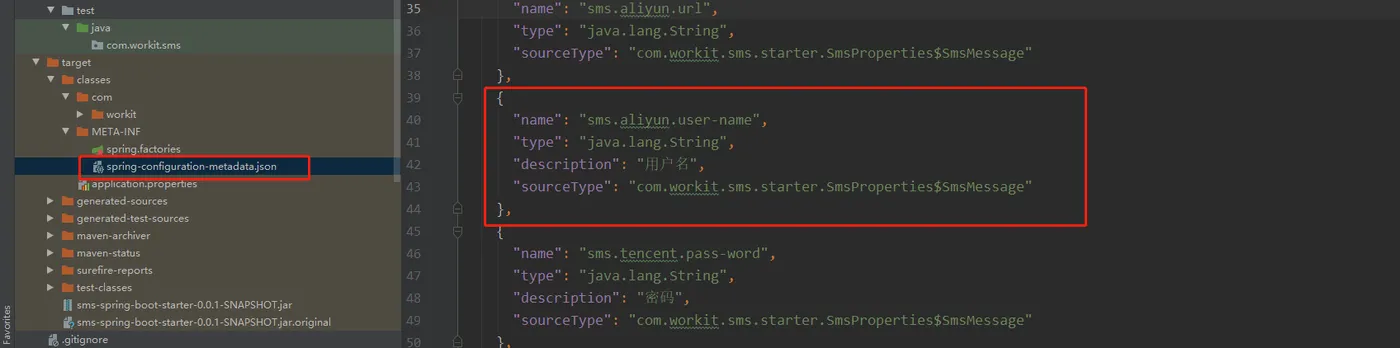
我们可以看到这个文件其实 是根据SmsProperties类的成员属性来生成的。
- 然后在编写短信自动配置类:
1 | |

编写我们的发送短信实现类:(功能类)


1 | |
- 让starter生效
starter集成应用有两种方式:
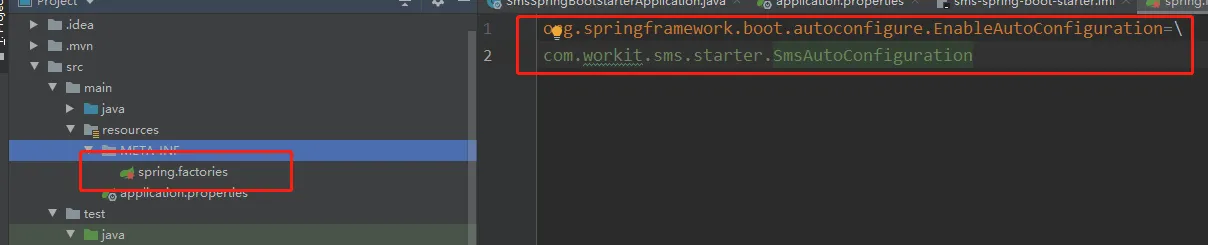
- 被动生效
我们首先来看下我们熟悉的方式,通过SpringBoot的SPI的机制来去加载我们的starter。我们需要在META-INF下新建一个spring.factories文件key为org.springframework.boot.autoconfigure.EnableAutoConfiguration, value是我们的SmsAutoConfiguration 全限定名(记得去除前后的空格,否则会不生效)。

- 主动生效
在starter组件集成到我们的Spring Boot应用时需要主动声明启用该starter才生效,通过自定义一个@Enable注解然后在把自动配置类通过Import注解引入进来。
1 | |
使用的时候需要在启动类上面开启这个注解。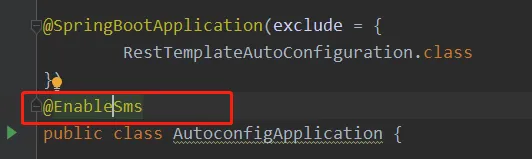
打包,部署到仓库
如果是本地的话,直接通过mvn install命令就可以了。
如果需要部署到公司的仓库话,这个就不说了。新建一个新的SpringBoot项目引入我们刚写的starter
1 | |
在项目配置文件配上短信账号信息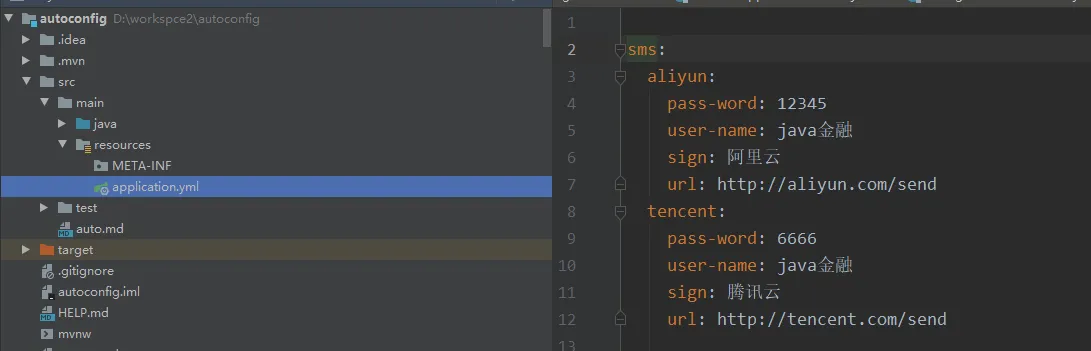
测试代码
1 | |
运行结果:
1 | |
至此的话我们自定义的一个starter就已经完成了,这个starter只是一个演示的demo,代码有点粗糙。重点看下这个实现原理就好。
https://www.cnblogs.com/tjudzj/p/8758391.html
end